Hollowing Clay Sculpture

Hollowing clay sculpture ready for finishing and firing is necessary when you are making one-off pieces. Follow a few simple rules and hollowing clay sculpture should be a breeze.
Most of my own sculpts are not actually fired. They are taken by the various factories I work with and cast for production.
However, I have supervised the hollowing and firing of my students' pieces in the past, so I know a bit about it.
The most important rules are to try to hollow to an even thickness of around ½ an inch, and to allow to dry properly before firing.
Don't Be Intimidated
Also save all the intricate finishing details until after the piece is hollowed, as the hollowing process can result in a few dings.
I thought it best to enlist the specialist knowledge of U.S. artist Orly Nezer in order to properly present this hollowing clay sculpture page.
Her thing is to hollow and fire her pieces.
So I asked Orly to help put this page together.
The most important thing to note for anyone who hasn't done this before is not to be intimidated.
You simply work out where to slice your sculpt, so as to access the inside you want to hollow out. Then just go for it.
Don't Rush It
As usual my advice is to take your time and don't rush it. Take a few moments to get your brain in the right gear and then just carefully carry it out stage by stage.
"Bite sized chunks" is the best expression I know to explain how to go about any task which seems, on the face of it, daunting.
Goldilocks Clay
The clay must not be too soft, nor too hard, it must be just right. Just as Goldilocks would like it.
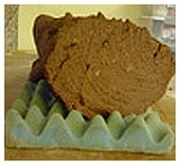
What Orly says is that the sculpt is ready to hollow when it is fully roughed out, and scaled, but not yet refined (the clay mustn’t be too soft - she lets it rest, covered, at least one day).
The sculpt is then put on a soft foam/sponge base (some people recommend a bag of sand). Orly then starts hollowing clay sculpture from the bottom of the base.
Use Your Loop/Cutter Tools
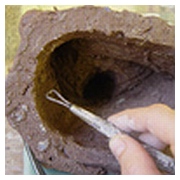
The sculpture is hollowed out using various loop/cutter tools.
REMEMBER! The walls of the sculpture should be around ½ an inch. Don't get too up-tight about measuring all the time. Just get a feel for it.
Why?
Walls that are too thin or too thick set up thermal stress points in the firing (especially where it goes from thick to thin).
Aslo try to ensure there are not locked air bubbles anywhere at this point.
Make Other Access Points As Necessary
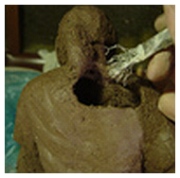
If she needs to access other areas Orly makes a hole where appropriate.
Sometimes my recommendation would be to section and work with the piece off sculpt. Only the artist can decide - it depends on the piece.
Orly then scores the edges of the hole and applies Slip (clay and water mixed), then reseals, being careful not to create air pockets that will be sealed up when the piece is reassembled.
And Finally
Once you have sliced and diced your sculpt. It should now be hollow - evened to about a ½ inch thickness (give or take).
You can now begin to tidy up any dinks and then do the final stage of the sculpt which is, of course, the final touches, details and finishing.
Once you have finished your clay sculpture, remember to allow enough time for it to dry thoroughly, but really slowly.
Start by drying inside the bag with just a bit of air circulating and then, over several days, gradually allow more and more air to circulate around the piece.
Once you take the bag off completely, please make sure the piece is totally dry before attempting to fire. And, similarly allow plenty of time for the piece to cool before removing from the kiln.
Any sudden change in temperature can induce thermal shock.
Photos courtesy of Orly Nezer.
return from
hollowing clay sculpture
to clay sculpting