The Master Tools Clay Sculpture Tutorial
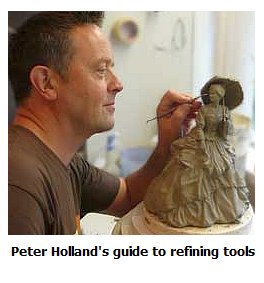
This page consists of a clay sculpture tutorial which will look to catalogue the type of tools you might need once you go past the basic stages.
There are a big range of tools available to the modeler.
The tools I show on this page are not the be-all-and-end-all, just the ones that have worked for me over the years.
Every person is different and must seek to find their own individual way. Think of this tutorial as a guide through the woods.
I take each of the tools I use, and explain them one by one.
In this clay sculpture tutorial I also explain each technique that relates to each tool, and how that applies to the various stages of making a sculpture.
When I broke it down, I was able to identify six different stages of a sculpt.
Elsewhere on this site I show a sculpt being made from start to finish, but this page is a catalogue of tools and techniques, so save this page for reference and keep referring back.
Here is a reference list of the six techniques.
- Adding
- Repositioning
- Scraping/shaping
- Paintbrush work
- Smoothing
- Fine detailing
Quick link:- Basic tools described here
A Catalogue of Master Tools
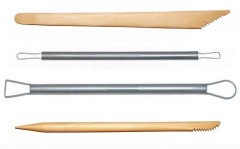
Claw Scraper (serrated edge)

This curve edge serrated edge scraper is my number one tool for general shaping in clay sculpture development, finishing and refining of any piece I do (after the first roughing our phase is complete). Please remember that everyone is different, but these are my clay sculpture tutorial, so you an insight to my methods!

A nimble cutter, the curved serrated edge also serves to shape flowing, even, curved planes. Although it's steel versus clay, I wear this tool out every couple of years. I'd be lost without it.
| techniques used for - scraping, shaping, cutting, smoothing |

Round Edge Serrated Scraper
This round edge serrated scraper gets to the parts the curve edge can't.

Apart from that, similar in use to the claw scraper apart from the fact its not so nimble used as a cutter.
| techniques used for - scraping, shaping, smoothing |

Mixed Use Tool
This mixed use tool has mixed use. First its a good applicator tool for applying small pellets of clay to specific areas.

Second, sometimes you have to shape and model precise edges - say the edges of clothing.
Finally (its the main use for this tool) I use it to sculpt hands and feet, by 'rounding off' the planes of the fingers & toes. I would refer to this tool in this clay sculpture tutorial as my "hand making tool", but it has other uses too.
| techniques used for - adding, cutting, hands, fingers, toes |
Small Spatular Tool
This tool has a very useful fine spatula end which comes off at a slight angle to help with access into difficult areas, such as, underneath the chin, or applying and pressing a tiny amount of clay to shape a cheekbone.
The other end is not one I use, so I can't tell you what it could be used for in this clay sculpture tutorial.
Obviously, other tools mentioned above can do the job of applying smallish amounts of clay, but when you are doing small intricate areas, you need this tool, or one very like it.
Tools like this are all about making difficult things just that bit easier.
| techniques used for - adding & blending (rolling) |

Dentist Clay Sculpture Tools
I use two different dentist tools. They are very specific and absolutely vital to the fine detailing, particularly on faces. If you like my faces, these are the tools which make the art possible.
One has rounded ends (small and smaller), the other has flat ends at different angles.

1. Both ends round. One smaller. Used for facial detail especially eyebrows, mouth, nostrils etc. Don't just use the end, use the side and corner .

2. Both ends flat. One on edge, one flat. Used for applying tiny amounts of clay especially for face and hands etc. Also very useful as a small accurate cutter.
| techniques used for - fine detailing, adding, cutting, scraping, shaping, smoothing, blending. All on small areas. |

Scalpel
A scalpel is used for slicing off thin layers of clay where the pressure of a clumsier tool may break off an arm or other unsupported area (remember, in this clay sculpting tutorial I am showing you how to sculpt in ceramic clay without using any armatures). Also good in small hard to access areas.
| techniques used for - cutting fine slices off thin areas which do not have an internal armature and are therefore delicate to work on (eg. a slender arm away from any support). Also for slicing through small areas in order to move them slightly or work on them off-sculpt (this technique is described in a separate clay sculpture tutorial). |

Potters Knife
Potters knives can be found in any potters store and is an essential bit if kit for a ceramic sculpture. It enables you to do all the things you do with a scalpel (see above), but gives more freedom because it allows you to do it on a larger scale than a scalpel. I love this bit of kit - and use it mainly for correcting and adjusting.
| techniques used for - like the smaller scalpel above, it can cut fine slices off thin areas which do not have an internal armature and are therefore delicate to work on (eg. a slender arm away from any support). Also for slicing through larger areas in order to move them slightly or work on them off-sculpt (eg. repositioning an arm), or cutting through the waist to tilt the upper body slightly, or cutting in order to hollow for firing. |
Clay Extruder
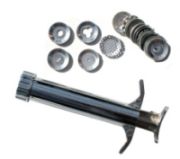
I find an invaluable tool I use all the time is the clay extruder. Clay is hard to roll into small strings as it tends to dry out too much. However, clay is easy to extrude in small strings and neat flat lengths. Also I use the larger shaped holes to sculpt musical instruments like harps and tambourines.
| techniques used for - adding, making thin bits of clay for decoration and finishing. A must have tool for finessing. |


Handmade Tool
"A man who does not make his own tools does not make his own art." Michelangelo
This tool is made from a length of dowelling and part of a hacksaw blade.
One end is flattened (not too fat & not too thin) then rounded off and used for applying and blending clay. This is my most used applicator tool in this second phase of the sculpt.
The serrated end is used mainly for gentle fine tuning of facial contours. It's hard to explain every important application in this clay sculpture tutorial, but I always find a female face needs gently caressing with this end of this tool.
| techniques used for -
1. adding & blending 2. shaping 3. shaping & scraping |


Brushes
There are three types of brushes I have found useful over the years. Each has a specific use.
Medium stiffness. Used for wetting sculpt before adding fresh clay. Also, you use this brush for smoothing clay with water to the first stage of a neat finish. Note: Not all sculpts need to be smoothed, some you want to show tool marks and a rougher finish. You can also use this brush as a modeling tool to manipulate fresh clay (painting on).
Large Ceramic Smoother Brush. This is a specialist flat ferrule brush for smoothing to a final glossy finish. The wet bristles leave no brush mark on the clay, but still have enough resistance to remove a layer. Ask at your local pottery supplier or contact me for more information.
Small Smoother brush (cut-quill shank). This is a specialist brush for smoothing small areas of flesh tone on the face of ceramic figurine sculpts.
| techniques used for -
1. wetting 2. adding & blending 3. shaping 4. smoothing 5. painting on |
Summary
So, above I list pretty much all of the tools I use and for which techniques I use them.
I haven't really kept anything back, I don't think. The thing to remember is that building up a complex clay sculpture is pretty much like any other complicated task.
It takes less than time than building a house, but more time than, say, painting a water colour. Get an idea in your head of that a figurative clay sculpture really can't be done in a day, or a week for that matter.
As in any complex task, break it into bite size pieces and understand 1. The 6 different techniques discussed on this page and the tools with which to accompany them.
© Peter Holland's Master Tool Clay Sculpture Tutorial
Return from Master Tools Clay Sculpture Tutorial to Homepage or alternatively back to the Clay Sculpting main page