- Home
- Collecting & Sculpting
- How to Sculpt Faces
How to Sculpt Faces in Clay: Master Sculptor's Complete Guide
Notable insights into how to sculpt faces for figurines and busts for collectors and sculptors.
By Peter Holland, Master Ceramic Sculptor | Updated December 2025
Introduction
Learning how to sculpt faces in clay is the single most challenging aspect of ceramic sculpture. A human face is one of the most complex geometrical shapes you will ever encounter—when pushing around bits of clay, tiny fractions of a millimeter can make the difference between a bonny baby and Winston Churchill.
After decades creating portrait sculptures for Royal Worcester, Coalport, and Compton & Woodhouse, from 15-inch busts to miniature faces less than an inch high, I have developed systematic methods that make this seemingly impossible task achievable, even for dedicated beginners.
 Smaller faces for 10" figurines also have to be accurate, blemish free and have real character - although they are only less that one inch high. This is the challenge of a master sculptor for bone china production
The portrait above was a 10" high figurine I did for a commission from the prestigious Figurine Collective - a company I set up with the inimitable John Bromley, master sculptor supreme and my mentor. The face measures less than an inch high. It has to be a characterful and accurate and smooth as the larger bust - see the bust I did of Kate Middleton with baby (above).
This clay portrait tutorial reveals the professional techniques, measurements, and practical methods I use to create realistic portrait sculpting that collectors value and recognize. Whether you're sculpting your first face or refining your technique, the principles remain the same: systematic preparation beats guesswork every time.
📋 Page Contents
- 1. Why Faces Are the Ultimate Challenge
- 2. The Fundamentals: Geometry & Recognition
- 3. The Essential Prep List
- 4. The 6 Stage Process – Gradually Building the Facial Planes
- 5. Alternative Approach: The Silhouette Cut-Out Method
- 6. Refining Features & Capturing Soul
- 7. Common Mistakes & How to Avoid Them
- 8. For Collectors: Reading Facial Quality
- 9. Summary
1. Why Faces Are the Ultimate Challenge
Collectors judge faces before anything else. A figurine with a mediocre face will never feel truly desirable, however exquisite the drapery or decoration. The difference between a charming figure and a highly valued collectible often comes down to the face, the single most complex geometrical challenge in all of clay sculpture.
Your eye is the problem, and the solution. Human facial recognition evolved over three million years. We can instantly spot fractional differences between two people who look remarkably alike (like Kate and Pippa Middleton). The dilemma of sculpture is telling a sticky lump of clay how to replicate those fractional differences that our eyes detect instinctively.
We must use technical aids to even the odds against the clumsiness of clay. The goal is not merely to look human, but to capture the approximate geometry, the likeness, and the soul of the person.
2. The Fundamentals: Geometry & Recognition
If you're aiming for portrait sculpture techniques that achieve true likeness of a real person, understand this: in technical terms, there are only fractional differences in the geometry of faces between two people who look completely different.
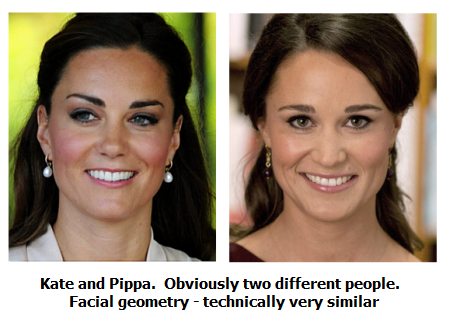
Kate and Pippa look very alike, with good reason; they are siblings and the geometry of their faces is remarkably similar. But our eyes possess the highly tuned skill of instant facial recognition. We know instantly they look like completely different individuals, but how do we tell our piece of clay what the differences are?
Thereby hangs one of the biggest dilemmas of sculpture: finely tuned visual recognition evolved over 3 million years, versus a sticky lump of mud from the ground.
If you look closely at the comparison above, you'll see the two big points of difference to the sculptor's eye are the nose and the eyebrows. So that is what we tell our piece of clay.
However, before we get to the fine-tuning stage of eyebrows and noses, we obviously need to:
- Produce something which looks vaguely human
- And vaguely female
- Something with approximate geometry of the Middleton faces
- Something that appears more like Kate than Pippa
We need to even the odds in our favor when learning how to sculpt faces. That's where systematic preparation comes in.
3. The Essential Prep List

There are many time-lapse videos on YouTube of very able sculptors doing their thing, very useful in their own way. But I have a problem with those tutorials because they miss out the main player in this whole game: the principles of what a sculptor's mind has to do in order to accomplish something as difficult as modeling faces in clay.
Those videos make it look easy. They're time-lapsing away the hours and days of mental process, the fine adjustment, sweat, and toil it takes to tell the clay what to do.
I'm interested in what it takes for YOU (not someone else) to sculpt a real-looking face that not only looks vaguely human, but also looks like the person it is supposed to resemble.
This prep list applies whether you're sculpting to large or small scale. My own specialty is sculpting faces which are small but very realistic portraits of ladies' faces (see photo) -nthe faces are less than an inch high. However, I also do occasional portrait busts like the one shown at the top of this page, which is about 15 inches high.
The Non-Negotiable Groundwork:
- Don't go by eye alone until you're very experienced (in fact, until you classify yourself as a genius).
- Really get to know the face of your subject and the proportions of their features by accurately measuring and scaling.
- Reference Photography: If your subject is unable to sit for you for hours on end (unlikely, but a romantic misnomer often shown in movies), photograph the subject (or find photographs if they're famous) from front and side, ensuring faces are not angled up or down but pointing straight at the camera.
- Scaling: Use a photocopier or digital tools to scale the photos down to the required size of your sculpture.
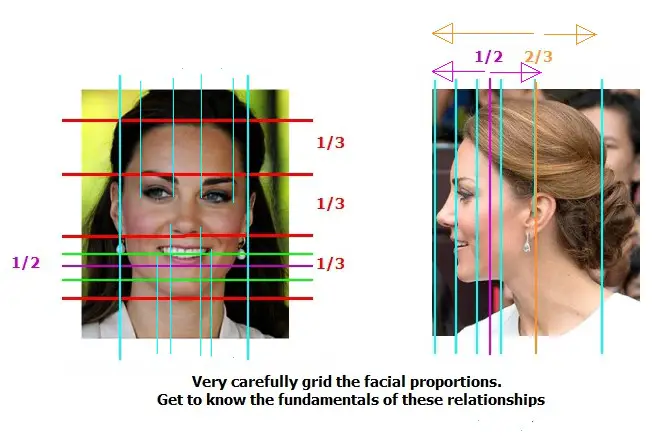
- Gridding: Draw grid lines on both side and front views to study the distances and planes (the flat or curved sections of the face).
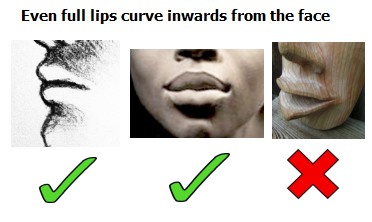
⚠️ Critical Plane Study: The Lips
The mouth follows the curve of the teeth inside. The lips do not project outward from a flat plane; they curve inwards to meet the teeth from the facial muscles above and below.
Many beginners sculpt the mouth onto the flat plane of the face with outward lips. This gives the characteristic thin-mouthed pout of a primitive carving.
Key Proportional Facts:
- The eyes are halfway between the top of the head and the chin, something most beginners refuse to believe (they mistake the top of the head for the top of the forehead). That's why I say DO NOT do things by eye unless you're very experienced and know your measurements by heart.
- Study and note the relative positions of features on your grid lines and follow what the diagram shows you. When you're a 'master' you can dispense with measurements. I still check measurements, although I'm referred to as a 'master sculptor.'
- Then, and only then, you can use artistry to capture the soul of the person.
 Key facial proportions: Eyes at midpoint, one eye-width spacing, ear placement etc
4. The 6 Stage Process – Gradually Building the Facial Planes
The professional sequence for realistic portrait sculpting always begins with structuring the facial planes. Many beginners, who have not yet learned how to sculpt faces, jump straight to eyes and mouths, but this almost always leads to an overworked, awkward, or "dog face" (where the eyes are set too far back in profile).

Build a simple head and facial plane without detail, then form and mark basic planes of forehead, cheekbones, jaw. Only then suggest eye location, nose, and mouth.
Measure Key Foundational Proportions Relentlessly:
- Eyes at horizontal midpoint of head (not the forehead)
- Eyes separated by approximately one eye-width
- Nose approximately one eye-width at base
- Ears span from the eye line down to the nose base
- Lips go inwards from the plane of the face below the nose (the prolabium), and do not protrude from the face.
Use your earlier research and measurements to place features accurately, too high or low by even a millimeter changes age and character. There are about 6 different phases to developing a face - just to get the basic structure in the right place - character comes as a final stage after the first 6 phases - when she has hair and clothes.
When I'm asked how to sculpt faces for clay figurines and busts, I often break it down into six phases as follows:

5. Alternative Approach: The Silhouette Cut-Out Method
Immersing yourself in the accurate geometry of how to sculpt faces can be quite fun rather than hard work, but I try not to let it be a substitute for actually starting the piece. Here's a clay face sculpting tutorial method that helps face sculpture get off to a good start.
To ensure you nail the geometry from the start, this practical method eliminates two dimensions of error immediately:
📐 An Alternative Practical Method to Sculpt Faces For Beginners To Try
- Get a profile photo (like the one of Kate shown earlier)
- Scale it and print it out to the right size
- Cut out around the shape of the face and head (the silhouette)
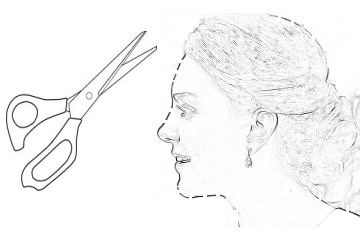
- Roll out a slab of clay to a thickness equal to the width of the subject's nose (about the distance between the eyes)
- Let the clay become leather-hard so it holds its shape but can still be easily cut
- Place the silhouette photo on the clay, mark around it, and cut out the shape
- Thicken up the neck enough for the piece to stand on a bat
You now have a slab of clay that is a perfect profile and height. Two of the three dimensions are perfect—the profile and the height. You only need to add one further dimension (width) instead of all three.
- Follow your scaled grid photos. Build up the rest of the head first rather than the face, as this will build structural support for the sculpture.
- Once you have the basic but accurate geometry in place, you can begin to work on the small details which differentiate one face from another.
- Once you reach a certain point, start thinking about the person themselves—what might make them tick, how they might think. Thinking about them, rather than you, will begin to translate into the piece and help give it real character and emotion. This is where the real fun of learning how to sculpt faces starts to happen.
6. Refining Features & Capturing Soul
Once the basic, accurate geometry is in place, you can move to the small details that differentiate one face from another.
Expression and Subtlety
Small changes in eyelid angle, mouth corners, or head tilt create serenity, sadness, joy, or mischief. Aim for subtlety; over-dramatized faces quickly become caricatures.
Once you reach this point in your sculpture having facial anatomy worked out, you can start to think about the person themselves, their personality and character. How to sculpt faces is not just a technical process, thinking about the person you are depicting, rather than the clay, will begin to translate into the piece and help give it real character and emotion.
The Multi-Angle Check
A face that works only from straight on is not acceptable. Rotate the head: three-quarter and profile views must still look human and alive.

I examine the front, three-quarter, and profile views of this tiny face - less than an inch high, all must work for professional quality. Then it is time for the face to become part of the sculpt and to be worked on for character.

So, with a figurine face, I always sculpt the face separately as the tiny scale dictated that it is almost impossible to get the finesse and accuracy required if you try to sculpt it in situ. It's a different matter with a large scale bust, although I still do a lot of the initial figuring out of structure and dimension on the face first without it being attached to anything. Some sculptors may tell you how to sculpt faces differently to this, but I find this the most efficient for my meticulous style.
Once the face is placed onto the rough of the figurine, and the subject has hair and clothes, then you can really start to lean into the character and expression. This is when we inject something that captures to soul of the subject and see what she's about.
Tools and The Sculptor's Courage
The finest facial detailing requires specialized tools: tiny dentist tools, steel loops for eye sockets and nostrils, fine wooden and metal spatulas for building delicate planes, and quill-handled sable brushes for final smoothing. Tools for Clay Sculpting - Basic to Advanced I've spent decades refining which implements produce the crispest detail at miniature scales.
If, after all corrections, the face still feels wrong, professionals are not afraid to keep going and keep doing tiny adjustments until the face is what they want.. That courage to not give in to second best, to keep doing those fractions of a millimeter adjustments are the final part of mastery - do or die
7. Common Mistakes & How to Avoid Them
The "Dog Face" Error
As mentioned previously, many beginners place eyes too far back in profile, creating an unnatural receding face. Solution: Check your grid measurements—eyes should project forward from the skull, not sit deep within it.
Primitive "Pout" Lips
As also covered above, lips that project outward from a flat face plane look wooden and primitive. Solution: Remember the teeth curve. Lips wrap around that curve, creating natural fullness, but that curve goes inwards, not outwards.
Eyes Too High
This is the single most common proportion error, as we already mentioned. Solution: Measure religiously, eyes sit at the horizontal midpoint of the entire head (from crown to chin), not at the midpoint of the face.
Not Working the Planes & Underlying Structure Enough
Some say 'endless fiddling destroys the freshness and life of a face' - I do not agree - work systematically (structure → placement → refinement), then have the courage to keep going until the darned thing looks right to your judgmental eye.
8. For Collectors: Reading Facial Quality
Understanding how to model a face helps collectors evaluate quality and authenticity in bone china figurines and ceramic sculpture.
Professional Quality Indicators:
- Proportional accuracy: Eyes truly at midpoint, are features properly spaced and well defined, despite glazing and moulding attrition during production?
- Multi-angle success: Face looks natural and alive from front, profile, and three-quarter views
- Subtle expression: Emotion present without caricature or melodrama
- Structural integrity: Face clearly built from facial structure and foundation, not surface details guessed at
- Tool marks not visible: Final smoothing complete, not rough or underworked
Amateur Quality Tells:
- Eyes placed too high (most common error)
- Dog face (eyes too far back in profile)
- Primitive pout (lips project outward)
- Works from front only, awkward in profile
- Under-worked character and features
As someone who has spent decades making master sculptures for Royal Worcester, Coalport, and Compton & Woodhouse, I can tell you: the face reveals everything about the sculptor's discipline. A mediocre face cannot exist on a professional-quality figurine, it's the first thing that gets rejected in factory review. It is why only a few sculptors get to the very top. Many are called, but few are chosen.
9. Summary
In this how to sculpt faces guide, I've tried to give people with the 'clay bug' a systematic, practical method where they can realistically attempt to model a portrait in clay, even if they're beginners.
The main points to take on board:
- Your eye is highly evolved for facial recognition, the clumsiness of clay is no match whatsoever
- Technical aids even the odds out in your favour: grids, measurements, the silhouette method
- Structure before features: build the facial planes foundation first, always
- Measure, adjust, measure, adjust: because clay is essentially non-cooperative mud, we need to tease it into place bit by bit
- The multi-angle check is non-negotiable: professional work succeeds from every viewing angle
Once you've accepted this systematic approach and decided to work with it, you'll find things roll into place much more easily.
Whether you're creating miniature faces for fine bone china figurines or life-sized portrait busts, the principles remain constant. Master these realistic portrait sculpting techniques, and you'll understand why certain pieces command collector premiums, and why others, despite beautiful decoration, never quite achieve that indefinable quality that makes faces truly come alive.
Hopefully, you found this page on how to sculpt faces fascinating. How about finding out the value of your stuff now?......

Inherited a china set?... Download my free 7-point checklist to instantly assess its potential value.
You might like these pages too...
Master Clay Sculpting: The Process From Concept to Composition
Master the clay sculpting process from concept to composition. See the structural discipline that creates lasting, high-value collectible art for manufacturers
China Replacement Online - The Secrets of Searching
China replacement tips - How to search online and which sites are the most useful.
How is Bone China Made? A Master Sculptor’s Guide
How is bone china made? Curious about the craftsmanship? Here's a master sculptor's guide to both collecting & sculpting and what makes each piece so special.
Art Pottery - Revolution Within Revolutions
Art Pottery is the place to sling mud - Bernard Leach turns in his grave
Coalport Figurines - A Fine History
Coalport Figurines - Craft, Guile and Romance. Shopping galleries and information. Meet the artists.
Clay and Art Join Forces to Fire-up a New Generation of Fine-Art Potters
Clay and Art combine as the 21stC brings forth a new age of potters. The Turner prize for a wheel-turner? Whatever next? Self-expression fires the kilns
How Do You Make Porcelain: Master Ceramicist's Complete Guide
How do you make porcelain? Complete step-by-step guide from an industry insider. Instructions include: recipes, firing temps & pro techniques
Art Sculpting Ideas For Parents & Kids
Fun art sculpting ideas for parents and kids. Easy clay projects from wall plaques to animals. Free tutorials, beginner-friendly tips. Start creating today!
Where to Buy Clay Sculpting Supplies - Trusted Suppliers Guide
Find quality clay sculpting supplies from expert-vetted UK and US suppliers. Tools, ceramic clay, kilns, and in-person advice for beginners to professionals.
Clay Artists - Who Are My Favourites?
Clay Artists have produced some of the most exquisite art known to man. Take a look at my favourite ones.
Collectible Figurines
A Selection of Collectible figurines sculpted by Peter Holland
cp-recipe
cp-recipe
Clay Sculpture Detailing Techniques By Master Ceramic Sculptor
Clay sculpture detailing & finishing techniques; how we make clay figures so neat and perfect. Part 3 of the 'sculpt from clay' for bone china production series
What Is Fine China? What the Term Means to Collectors and Makers
What is fine china? Discover what makes china truly "fine"; beyond material to craftsmanship, prestige & value. Top makers; what separates 'fine' from ordinary.
China replacements - Website Review
China replacements - This a review of the best of the web for chasing your china items
3 Types of Clay for Sculpting Figures: Ceramic, Plasteline, & Polymer
Discover the best clay for sculpting figures and figurines. Expert guide covers ceramic (water-based), plasteline (oil-based), and polymer (oven-bake) mediums
Clay Art Goes Back to Pre-historic Times
How old is clay art? Stone Age man developed the technology to make ceramic art - and we have been obsessed ever since.
Collectible Figurines - The 'Collecting Buzz'
Collectible figurines interactive page - tell your story, meet the artists, ask a question, share your buzz online!
Porcelain China - The Complete Online Guide
A unique online guide to porcelain china with brief talking points for quick connoisseurs
The English Bone China Tradition - An Insider's View
Connoisseurs of English bone china will enjoy some unique insights to this long tradition
Cold Porcelain Fria Recipe Secret
Cold Porcelain Recipe Secret - Find out Nicole's 'Microwave Method'
What is Porcelain? The Ultimate Guide by Sculptor, Peter Holland
Exactly what is porcelain to master sculptor Peter Holland? Its unique properties, history, its different forms, is why "white gold" is more than just a ceramic.
Cold Porcelain Recipe
Cold porcelain is an air drying clay made from a recipe of corn starch (flour) and glue. Difficult to get mix, we look at how to make it just right
Contemporary Clay Art - Has A New Chic.
Is contemporary clay art pure 'fine art', or is it merely craft? Read this to find out.
Caring For Figurines
Caring For Figurines - There is a skill to it. Learn how to properly care for your prized collection


From the Studio
• Peter Holland Posters
• Sculpture Studio